When you want to make an impact on potential contacts without making one on your wallet, Printroom is here to provide you with high quality, affordable printing services. We’ll make sure every impression you make is one that lasts. Call us today!
Design Help
Trims & Bleeds
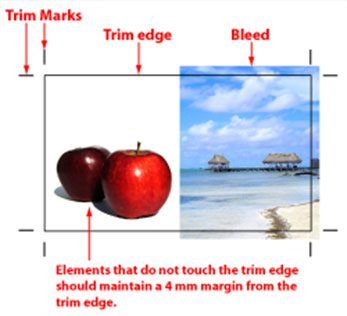
Before you start work on any design and layout, make certain that your document is set at the appropriate BLEED size for your project (or download pre-made templates here). The “trim size” is the final dimension that your printing job will be cut to (before any folding, if needed). However, an additional 3mm bleed is required wherever design elements touch the edge of your trim dimension (for example, if your trim size is 90 x 55 mm create your document to 96 x 61 mm and set margins 4 mm in from all four edges. This means that any element that touches the trim edge must be allowed to extend past the trim edge by at least 3mm.
This assures a safety margin during the post production trimming of your project to assure that your bleed elements remain touching the trim edge without any white, unprinted gaps between the bleed element and the trim edge.
If you have any design elements (including borders) that come too close to the trim edge, and you do not intend for them to touch the trim edge, then you must “back it away” from the trim edge by at least 4mm.

Maintaining Legible Type and Strokes
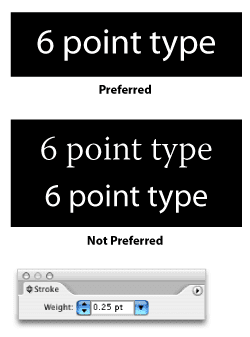
One typical mistake is design is the use of type or strokes/hairlines that do not print well and thus wind up being illegible. To avoid this mistake, shy away from type sizes smaller than 6 pts and lines (rules) thinner than .25pt.
Type smaller than 6 pts becomes difficult to read anyway, and finer details may be difficult to hold on press anyway. Typical body copy should run between 9 and 12 pts in size for maximum readability.
Be careful when using “reversed out” copy (ie: text that is a light color running across a darker area). Because the darker area tends to bleed into the lighter text area on press, it is recommended that you use at least 6 pt type, and sans serif fonts, in these instances.

Image Quality & Colour
When using images within your design, it is very important that you use the best quality images and color spaces possible.
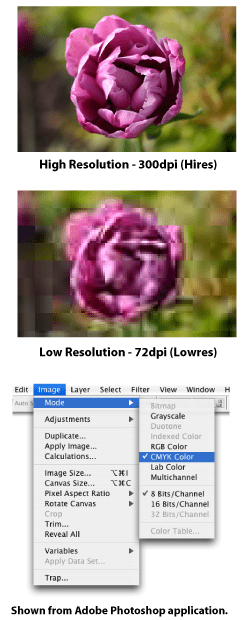
Resolution: Be certain to use image resolutions 300 dpi (or ppi) or better for color and grayscale images (otherwise known as “halftone” images), and 1,200 dpi (or ppi) for bitmap images (otherwise known as “line art”). Click here for more information on image resolution.
Image Quality: Use non-compressed file formats such as TIFF, EPS or native Photoshop files when possible (without compression settings). If you need to use a compressed file format like JPEG in your design, make sure the image is saved with “Maximum Quality” settings. This will prevent loss of image quality during the compression process.
4/4 and 4/1: The use of 4-color process (CMYK) on both sides of your print job is referred to as “4/4” (pronounced “four over four”). The use of 4-color process on the front side of your job, but grayscale or black and white on the back side is called “4/1” (pronounced “four over one”).
4-color Process (CMYK): When using color or color images in your design and layout, be certain to use CMYK values instead of RGB. CMYK (Cyan, Magenta, Yellow and Black “K”) is the color space that printers use to run your job. If you have an image that is RGB, like images that come from your digital camera or scanner, you must convert them to CMYK first before placing into your design.

Using ‘Rich Black’
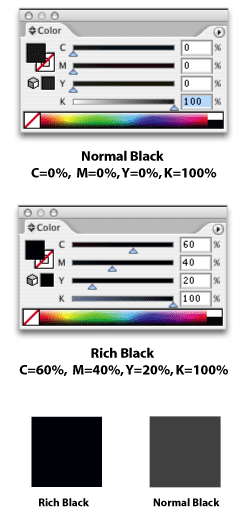
When using black elements in your 4-color design, it is best to you use a “rich black,” which is a black composed of all four process colors. This gives your black a deeper, darker shade of black on press.
To achieve rick blacks, create a color swatch or assign a process color with the following CMYK combinations:
Cyan = 60%, M = 40%, Y = 20%, K = 100%.
Even though a “normal” black may appear as dark as you wish on screen, it may not come out as dark and rich on press. Use the “rich” black to be certain. Here is an example of setting the CMYK sliders in Photoshop’s color palette.
A rich black should be used on larger areas of black to ensure an even, dark coverage, as the second ink colour disguises any inconsistencies in the print.
Please note, rich black should never be used on small text, as any tiny deviance in registration will lead to a blurred effect.

Paper Stock
This is the paper stock your artwork will be printed on. The numerical value refers to how thick the paper is, measure in weight (grammage or gsm values); the larger the number, the heavier the stock.
Here are a few descriptions of the paper we offer.
- 104gsm – Great for letterhead. A lot more reliable with Laser Printers
- 115gsm – Gloss or Matt stock. Great for flyers and brochures
- 150gsm – Gloss or Matt stock. Great for flyers and brochures
- 230gsm – Gloss or Matt stock. Great for flyers and brochures
- 230gsm – Gloss or Matt stock. Great for flyers and brochures
- 260gsm – Gloss or Matt stock. Great for economical business cards
- 300gsm – Gloss or Matt stock. Great for Marketing Cards
- 310gsm – Gloss or Matt stock. Great for that extra sturdy business card
- 352gsm – Gloss or Matt stock. I love receiving heavy business cards. Your customers will too!
Product Size
This is the final trimmed dimensions of your product. If you are selecting a product with available folding options such as brochures or flyers, this is size is often referred to as flat size. Your finished size will be determined by the folding choice.
If your design has bleeds, please ensure that you design your artwork at least 2mm larger in each dimension.This is the final trimmed dimensions of your product. If you are selecting a product with available folding options such as brochures or flyers, this is size is often referred to as flat size. Your finished size will be determined by the folding choice.
If your design has bleeds, please ensure that you design your artwork at least 2mm larger in each dimension.This is the final trimmed dimensions of your product. If you are selecting a product with available folding options such as brochures or flyers, this is size is often referred to as flat size. Your finished size will be determined by the folding choice.
If your design has bleeds, please ensure that you design your artwork at least 2mm larger in each dimension.
Choice of Colour
This is the number of colours that will be printed on each sides of the paper, designated by FULL COLOUR 1 SIDE or FULL COLOUR 2 SIDES. As an example, 4/1 is four colours on the front and one on the back.
One or two colour options are for 1-2 colour jobs and use your colour specifications. Full colour printing is CMYK process printing, using four colours Cyan, Magenta, Yellow and Black to make photo-realistic images by layer colours over each other on white paper. It is very important that all full colour projects be design within the CMYK gamut for accurate colour representation. Four colour projects that utilize one colour back (4/1); the back ‘colour’ is grayscale and only uses the ‘Y’ or black channel.
Number of Pages
This is the number of pages for your project, if applicable.
Order Quantity
This is the approximate number of finished pieces for your project. Quantities may vary up to +/-5%.
Ordering Help
How to Place Order
Navigate to the Products section on the left hand side of the page and seleect a product on the list.
You will be presented a dynamic price calculator. From this calculator, you may pull down any box to select a list of available options. Once you’ve made your selections, the price will automatically update to show you the price of your selection.
After it gives you the price, you will see a ‘Proceed with Order’ section under the product you chose. You may fill in the details required and upload your artwork to place your order.
If you require assistance in preparing your artwork file or have any questions regarding our prepress specifications, please email [email protected]
Contact us for Help
Email or Call Us
If you require assistance in preparing your artwork file or have any questions regarding our prepress specifications, please email [email protected]
 PRINTROOM IS NOW BOLT PRINT!